How to Test a QR Code Before Printing: 5-Step Checklist
5-step checklist: multi-device scanning, distance testing, URL verification, contrast ratio, and structural validation. Catch QR failures before ink hits paper.
This article was written by the QR Nova team. We build QR code software, which may inform our perspective.
A QR code that scans perfectly on your laptop screen can fail completely after printing. The environment changes: screen light becomes reflected ink, pixel-sharp edges become slightly blurred module boundaries, and the scanning distance jumps from 15 cm to wherever someone holds a phone in front of a wall. Testing a QR code before printing is a five-step process, each step catches a different failure mode that the previous step misses. Skip any one of them and you risk discovering the problem after 500 flyers are already printed.
TL;DR
- Test on at least two devices: iPhone (native Camera app) and Android. Add an older Android if the code goes on high-volume materials.
- Test at the real scanning distance, not from 15 cm over your desk.
- Verify the destination URL is live and loads correctly on mobile.
- Check color contrast: minimum 4.5:1 luminance ratio between modules and background.
- Run the final image file through a QR validator to catch structural issues before the print shop does.
Why testing on screen isn't enough
Try it now — no sign-up needed
Get startedScreens emit light. Printed materials reflect it. That single difference explains most QR code failures that appear after printing: a color combination that looks fine on a monitor can fail on coated paper under fluorescent lighting, because ink absorbs differently than a display renders it. Screen tests also happen at arm's length with good lighting, while the real use case might be a visitor scanning a poster from across a room.
A second common failure source: file format and resolution. Most designers test by screenshotting the code from a generator, then send that screenshot to print. Screenshots introduce JPEG compression artifacts that blur module edges and cause decode errors. Test the actual export file you plan to send to print — not a capture of your screen.
Step 1: Multi-device scan test
Scan on at minimum two devices: one iPhone using the native Camera app (not a third-party scanner) and one recent Android. These two cover the two dominant scanner implementations. If both pass, you're in good shape for the majority of real-world scanners.
For high-volume print runs — trade show materials, product packaging, restaurant menus at scale — add a third: an older Android, two to three years old. Older hardware has weaker camera sensors that struggle with borderline contrast or small codes. If your code fails on an older phone, it's failing on a real share of your audience.
Don't test by scanning a screen. Display the QR code as a static image file at full screen, or print a test copy first. Screen scanning introduces variable glare and moiré effects that don't represent print conditions.
Step 2: Distance test
Test at the intended scanning distance — not from your desk. This is the step most people skip, and it's the one that exposes sizing problems before you commit to print.
The 10:1 rule from the QR code specification: scanning distance should be no more than 10 times the code width. A code 3 cm wide should scan reliably from no more than 30 cm. If your poster hangs on a wall and visitors scan from 80 cm, the code needs to be at least 8 cm × 8 cm.
- Business card or brochure (scanning distance 20–30 cm): minimum 2 × 2 cm
- A4 flyer or table card (scanning distance 30–50 cm): minimum 3 × 5 cm
- Wall poster (scanning distance 60–100 cm): minimum 6 × 10 cm
- Outdoor signage (scanning distance 1–3 meters): minimum 10–30 cm
Stand at that distance, hold your phone as a real user would — slightly tilted, maybe at an angle — and scan. If it fails, the code is too small. Resize and retest.
Step 3: Destination URL verification
Scan the QR code and watch what happens after it opens. Verify three things:
- The URL opens at all. If the browser shows a 404, an expired domain, or a server error, the code is technically scannable but functionally broken.
- The correct page loads. Confirm the destination is what you intended. Typos in URLs during QR generation are a common and embarrassing source of failures discovered post-print.
- The page loads on mobile. Open the destination on a phone, not a desktop browser. QR codes are almost always scanned on mobile; a page that breaks on small screens defeats the purpose.
For dynamic QR codes (where a redirect server forwards scans to your destination URL): verify that the redirect service is active and that the subscription or account controlling it is in good standing. A dynamic code pointing to a deactivated account is a live failure waiting to happen.
Step 4: Contrast check
Color contrast between the QR code modules (the dark squares) and the background is the most underestimated variable in print testing. Monitors display colors at much higher brightness than printed materials under typical lighting. A design that reads at 7:1 on screen can print at 3.5:1 on matte paper — borderline or failing for older camera sensors.
The minimum contrast ratio for reliable QR code scanning is 4.5:1 (the same threshold used in WCAG 2.1 for accessible text). Black on white hits 21:1 and is safe in any lighting condition. Custom brand colors need to be verified before you assume they'll work.
Use a QR Code Contrast Checker to measure your exact ratio before sending to print. Enter the module color and background color; it calculates the luminance ratio. Under 4.5:1 means darkening the modules, lightening the background, or switching to a different color combination.
Common contrast failures:
- Dark blue modules on dark gray background (ratio often 1.5:1–2:1)
- Light gray modules on white background (ratio under 2:1)
- Brand colors used without checking: forest green on white is fine, sage green on cream is not
- Inverted codes (light modules on dark background): technically work on modern scanners, fail on older ones and in poor lighting
Step 5: Validate the QR code structure
Visual inspection and device scanning catch most problems, but not all. A QR code can decode correctly in ideal conditions while carrying structural issues that cause failures in suboptimal ones: a quiet zone that's 3 modules instead of 4, a finder pattern damaged by logo overlay, or a version mismatch in the metadata. These don't show up until someone scans in poor lighting or at an angle.
A QR validator decodes the image file programmatically and checks the structure: finder patterns, timing patterns, alignment patterns, quiet zone dimensions, and data encoding. It also reports the decoded content so you can confirm the payload matches your intent.
Use QR Nova's QR Code Validator to run this check. Upload the actual export file (SVG or PNG at 300 DPI), not a screenshot. The validator decodes the code, checks structural integrity, measures contrast, and flags specific issues with descriptions of how to fix them. It takes about 10 seconds and catches failures that visual testing misses.
How to test a QR code before printing: full checklist
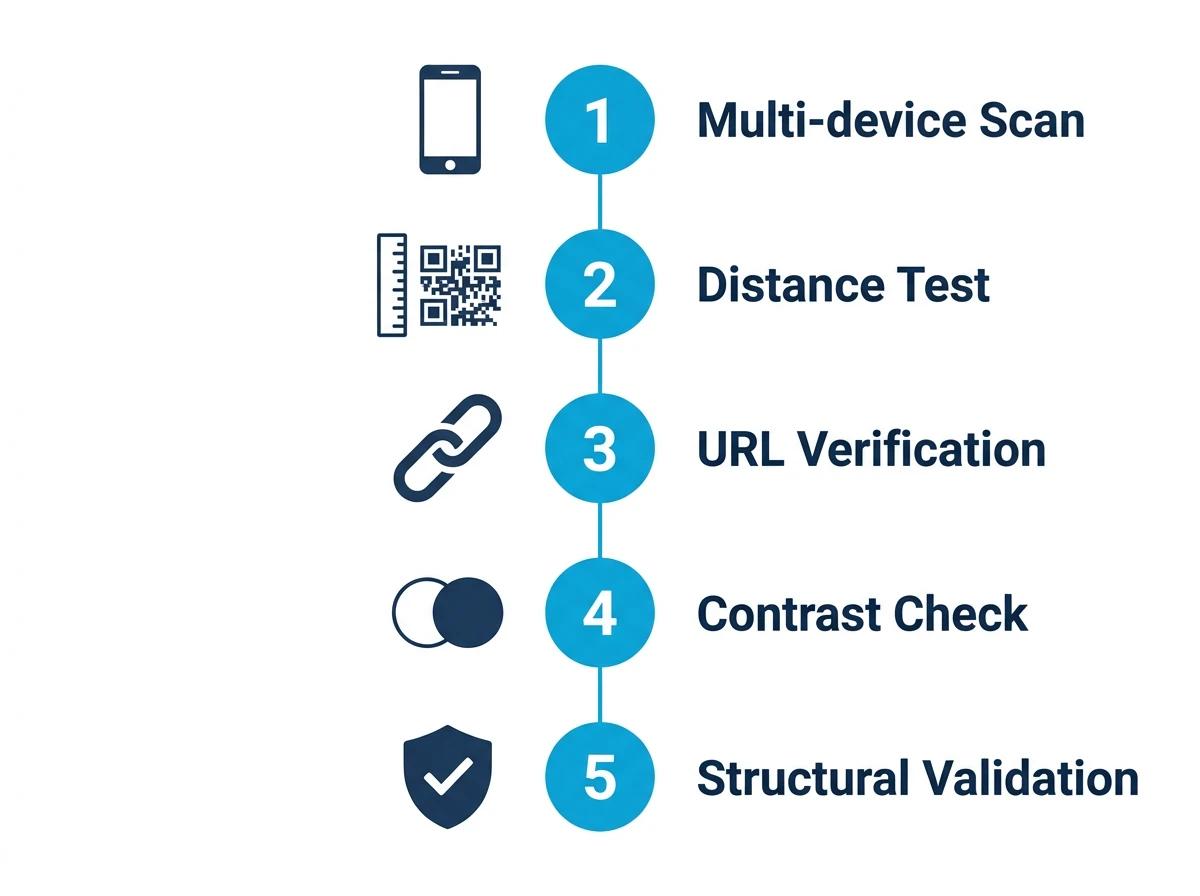
Run through all five before approving any print order:
- Scanned successfully on iPhone (native Camera app)
- Scanned successfully on recent Android
- Scanned successfully on older Android (for high-volume or public-facing materials)
- Tested at the real scanning distance, not from a desk
- Destination URL is live and loads correctly on mobile
- Color contrast is 4.5:1 or higher (verified with a contrast checker, not by eye)
- Quiet zone is at least 4 modules wide on all sides
- File exported as SVG or PNG at 300 DPI minimum at intended print size
- Validated with a QR validator tool using the actual export file
If you're printing on an unusual substrate (vinyl, fabric, frosted glass), print one physical test copy before the full run. Digital tests can't account for how specific materials absorb ink and affect contrast under real lighting. One test print beats five digital checks for edge-case substrates.
What to do if the QR code fails testing
The fix depends entirely on the failure mode:
- Fails on one device, passes on another: contrast is borderline. Increase contrast and retest.
- Fails at distance, passes up close: code is too small. Resize to meet the 10:1 rule for your scanning distance.
- Scans but opens wrong URL: typo in the original generation. Regenerate with the corrected URL.
- Scans but destination is dead: URL is broken or subscription lapsed. Fix the destination before printing.
- Validator reports structural issues: regenerate the code; don't try to patch a structurally damaged QR image.
- Contrast passes digitally but fails on print: increase contrast ratio to 7:1 or higher to account for print reduction, or test with the actual paper stock before committing to a run.
The checklist takes 10 minutes. The cost of skipping it shows up at the print shop — or after distribution.
Frequently asked questions
How do I test a QR code before printing?
Run five checks: (1) scan with both an iPhone and an Android at the intended scanning distance, not at arm's length over your desk; (2) verify the destination URL opens correctly in a browser; (3) confirm the color contrast between modules and background meets the 4.5:1 minimum ratio; (4) check the quiet zone (white border) is at least 4 modules wide on all sides; (5) run the image through a QR validator tool to catch structural issues that visual inspection misses. Do all five before sending to print.
What devices should I use to test a QR code?
Minimum: one iPhone (Camera app, no third-party scanner) and one recent Android. Ideally add an older Android (2–3 years old) because they use less capable camera hardware and represent a significant share of real-world scanners. If the code fails on any of these three, fix the issue before printing. Never treat a successful scan on one device as a pass.
How far away should I hold my phone when testing a QR code?
At the expected scanning distance in real life, not at arm's length over your laptop. If the code will go on a wall poster, test from 1 meter away. If it goes on a business card, test from 25 cm. Codes that scan perfectly at close range on a screen can fail at 60 cm on a matte printed surface. Use the 10:1 rule as a guide: the scanning distance should be no more than 10× the code width.
Can I test QR code color contrast before printing?
Yes. Use a QR Code Contrast Checker to measure the luminance ratio between your module color and background. The recommended minimum is 4.5:1 for reliable scanning across devices. Dark navy, forest green, or black on white or cream backgrounds typically pass. Light gray on white, dark blue on dark background, or any color combination with a ratio below 3:1 will cause scan failures in poor lighting or on lower-quality prints.
What is the best QR code validator tool?
A good validator decodes the QR image, verifies the embedded data, checks structural integrity (finder patterns, timing patterns, alignment), and flags issues like quiet zone violations or low contrast. QR Nova's QR Code Validator does all of this and reports specific failure modes with fixes, not just pass/fail. Upload your final export file, not a screenshot of a screenshot.
How do I know if my QR code will scan after printing?
No digital test is 100% equivalent to testing a physical print, but you can get very close: test the final export file (not a screen capture) at 300 DPI at the intended print size, at the real scanning distance, on both iOS and Android. Also print a test copy on the actual material before the full run, matte paper, coated paper, vinyl, and fabric absorb ink differently and affect contrast. If you can print one test copy, do it before committing to the full print quantity.
Why does a QR code pass on screen but fail after printing?
Three reasons: (1) Printed contrast is lower than screen contrast. Screens emit light; paper reflects it. A color combination that reads at 6:1 on screen can drop to 3:1 on matte paper. (2) Print resolution. If the code was exported at too low a DPI, the module edges blur during print, causing decode errors. Export SVG or PNG at minimum 300 DPI. (3) Scanning angle and surface. Glossy paper creates glare from overhead lighting that washes out the code for the camera.
Related articles
QR Code Best Practices (2026): 9 Rules to Prevent Failures
Exact size, contrast, quiet zone, and error correction numbers from the DENSO Wave standard — plus a pre-print checklist. Prevent scan failures before print.
QR Code Minimum Size: Smallest Size That Still Scans
QR code minimum size for print and phones: when 2 cm works, when it fails, and how to size labels, cards, menus, and posters correctly.
QR Code for Google Forms: Step-by-Step Guide
Create a QR code for Google Forms in under 2 minutes — free, no account, no scan limits. Step-by-step guide with size, placement, and testing tips.
Try it now — no sign-up needed
Get started